Introduction
Database as a Service (DBaaS) is a managed service offered by the cloud that allows access to databases without the demand for physical hardware setup, software installation, or database setup. The ChistaDATA Cloud for ClickHouse is aimed at providing fast, reliable, and functional solutions for users.
In this blog post, we would like to explain, with examples, how to connect to the ClickHouse cluster created in ChistaDATA DBaaS with Python.
Prerequisites
We will use “The Jupyter Notebook“, the web-based interactive computing platform, to connect to the ClickHouse Cluster with Python. For that reason;
- We need to run a ClickHouse cluster on the ChistaDATA DBaaS Portal. You can find detailed information about creating clusters here.
- If you would the to execute test scenarios with a Docker image, which contains ready to use “Jupyter Notebook”, you need to install “Docker Desktop“.
- If you would like to execute test scenarios from your local machine, you need to install “Python3” and “Jupyter Notebook” on your local computer. In that case, you can directly start from “Step 4“.
Important Notes for Jupyter Notebook:
Note 1:
In the Jupyter Notebook:
- if you have never run the code in cell, In [ ] will be empty.
- If the code is running but has not finished yet, we will see In [*].
- If the code run and finished, we will see In [ 1 ] (number will increase every single run)
For running the current cell, previous cells should not be In[ * ] state, which means the previous cell’s code should be run and finished.
Note 2:
- If you run the code and Jupyter Notebook asks for input (steps 5 and 6), after filling the input box, please hit “Enter“.
Note 3:
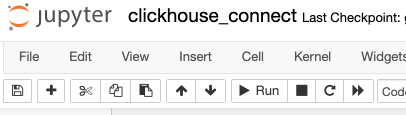
- For running the code in the current cell, please use the “Run” button as shown below.
Steps
Step 1
First of all, we need to install a Docker image that includes “Python” and “Jupyter Notebook”. For that reason, we’ll run the following command to pull the Docker image:
docker pull emrahidman/anaconda3:latest
Step 2
Now, it is time to run the Docker image. With the following command, we are able to use Jupyter Notebook from our local.
docker run -i -t -p 8888:8888 emrahidman/anaconda3 /bin/bash -c "\
    conda install jupyter -y --quiet && \
    mkdir -p /opt/notebooks && \
    jupyter notebook \
    --notebook-dir=/opt/notebooks --ip='*' --port=8888 \
    --no-browser --allow-root"
After running the command, it gives us an HTTP link as a message. We can open Jupyter Notebook with this link. Tokens will change in your cases.

Step 3
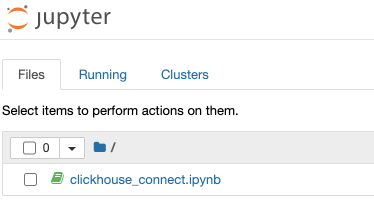
While Jupyter Notebook’s web page is opened, our main script (clickhouse_connect.ipynb) to connect to ClickHouse welcomes us. We prepared this script to run our test scenario. You can also write your own script.
Let’s open this script with a click.
Step 4
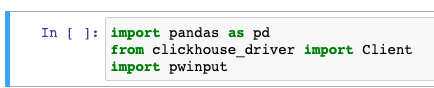
In the first cell of the script, we will import 3 components.
Here:
pandasis Python’s data analysis package. We’ll use it to plot the graph from the ClickHouse query.clickhouse_driveris designed to communicate with the ClickHouse server from Python over native protocol.- The
pwinputmodule is Python’s password masking tool, so we’ll use it to mask passwords.
import pandas as pd
from clickhouse_driver import Client
import pwinput
Step 5
For the standard ClickHouse connection, we need to know the hostname, username, password and database. For that reason, in the next cell of the script, Python asks us for the hostname.
We can find the hostnames on the “Clusters” page in the ChistaDATA DBaaS Portal. You can choose the cluster that you want to connect. In our example, we will connect to cluster-1 with the hostname “ws*********.chistadata.io“.
You can find detailed information about our portal here.
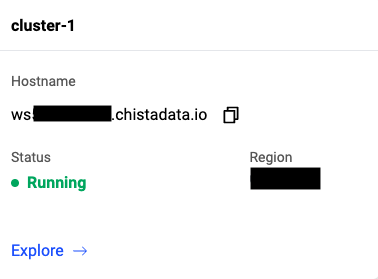
Now, we can enter the hostname(ws*********.chistadata.io) in the input box and hit “Enter”.
########################################################################################

CHHOST=pwinput.pwinput(prompt='ClickHouse Server Hostname: ', mask='')

########################################################################################

Step 6
In this step, Python asks us for the password for the default user. We specified that password on cluster creation, as shown below.

We can enter this password in the input box and hit “Enter”.
########################################################################################

CHPASSWD = pwinput.pwinput(prompt='Password for user default: ', mask='')

########################################################################################

Step 7
It is time to create a connection for our ClickHouse cluster. In this example, we use a secure connection (TLS) to connect to the ClickHouse database.
############################configure ClickHouse connection#############################
########################################################################################
client = Client(host=CHHOST, database='default', user='default', password=CHPASSWD,secure=True)
########################################################################################
########################################################################################
Step 8
In the scope of the test, we used the “New York Taxi Data” dataset. For that reason, first of all, we need to create a “trips” table in ClickHouse.
CREATE_TABLE="""
CREATE TABLE IF NOT EXISTS trips (
    trip_id             UInt32,
    pickup_datetime     DateTime,
    dropoff_datetime    DateTime,
    pickup_longitude    Nullable(Float64),
    pickup_latitude     Nullable(Float64),
    dropoff_longitude   Nullable(Float64),
    dropoff_latitude    Nullable(Float64),
    passenger_count     UInt8,
    trip_distance       Float32,
    fare_amount         Float32,
    extra               Float32,
    tip_amount          Float32,
    tolls_amount        Float32,
    total_amount        Float32,
    payment_type        Enum('CSH' = 1, 'CRE' = 2, 'NOC' = 3, 'DIS' = 4, 'UNK' = 5),
    pickup_ntaname      LowCardinality(String),
    dropoff_ntaname     LowCardinality(String)
)
ENGINE = MergeTree
PRIMARY KEY (pickup_datetime, dropoff_datetime);
"""
############################Create table for sample dataset#############################
########################################################################################
try:
    client.execute(CREATE_TABLE)
except:
    print("Unable to create table")
else:
    print("Table created sucessfully")

########################################################################################
########################################################################################
Step 9
The next step is inserting data from S3 into the “trips” table with the following commands: (This step may take a while.)
INSERT_DATA="""
INSERT INTO trips
SELECT
    trip_id,
    pickup_datetime,
    dropoff_datetime,
    pickup_longitude,
    pickup_latitude,
    dropoff_longitude,
    dropoff_latitude,
    passenger_count,
    trip_distance,
    fare_amount,
    extra,
    tip_amount,
    tolls_amount,
    total_amount,
    payment_type,
    pickup_ntaname,
    dropoff_ntaname
FROM s3(
    'https://datasets-documentation.s3.eu-west-3.amazonaws.com/nyc-taxi/trips_{0..2}.gz',
    'TabSeparatedWithNames'
);
"""
############################Insert Data to trips table##################################
########################################################################################
try:
    client.execute(INSERT_DATA)
except:
    print("Unable to insert data to trips table")
else:
    print("Data sucessfully installed on trips table")

########################################################################################
########################################################################################
Step 10
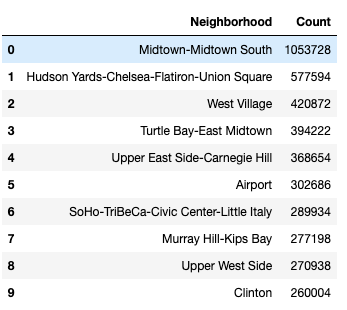
Up until now, we have created a table and inserted data into this table from Python with clickhouse-driver. Let’s have a look at the query table and append output to the pandas dataframe.
This query shows the top 10 neighborhoods that have the most frequent pickups.
pickup_count="""
SELECT
   pickup_ntaname,
   count(*) AS count
FROM trips
GROUP BY pickup_ntaname
ORDER BY count DESC
LIMIT 10;
"""
pck_cnt=client.execute(pickup_count)
######## Create Dataframe with sql query's data ##############
##############################################################
columns=['Neighborhood', 'Count']
df_pickup_count = pd.DataFrame(pck_cnt, columns=columns)
##############################################################
##############################################################

df_pickup_count
The result of the query is shown below.
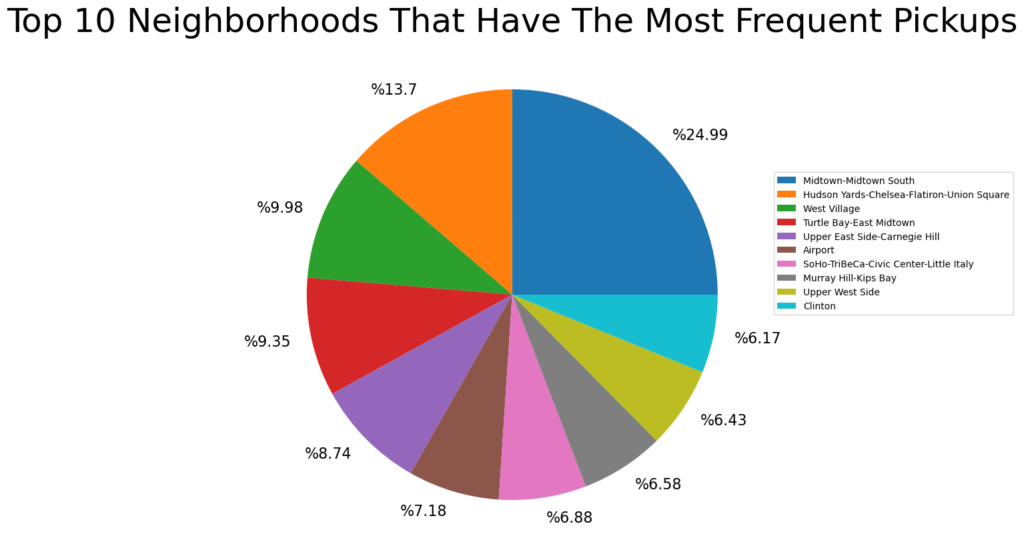
Step 11
Last but not least, let’s create a pie chart with neighborhood most frequent pickup query.
Firstly, we set the percentage of every result.
total_pickup=0
for count in df_pickup_count['Count']:
    total_pickup+=count

pickup_pct=[]

for count in df_pickup_count['Count']:
    pickup_pct.append('%'+str(round((count/total_pickup)*100,2)))
Then, we create a pie chart.
ax=df_pickup_count.plot.pie(y='Count',
                            labels=pickup_pct,
                            figsize=(10,10),
                            title='Top 10 Neighborhoods That Have The Most Frequent Pickups',
                            fontsize=16)
ax.title.set_size(36)
ax.set_ylabel('')
ax.legend(labels=df_pickup_count['Neighborhood'],
         loc="center left",
         bbox_to_anchor=(1, 0.1, 1, 1)
         );
The output of the code is:
Conclusion
In this blog, we talked about the DBaaS concept, the ChistaDATA DBaaS Portal, and connecting from Python to ClickHouse with explanations and examples. Please visit here to find various connection examples and FAQs.
To read more about ChistaDATA Cloud for ClickHouse, do consider reading the following articles
- ChistaDATA Cloud for ClickHouse: Benchmarking on OpenTelemetry Dataset
- ChistaDATA Cloud for ClickHouse v/s Google BigQuery: Comparative Benchmarking
- Connecting ChistaDATA Cloud for ClickHouse with Java