Introduction
Kubernetes orchestration simplifies many common operational concerns like scheduling, auto-scaling, and failover. It has support for Persistent Volumes and Persistent Volume Claims ( PV & PVC ). Usually, databases that support replication, sharding, and auto-scaling are well suited for Kubernetes. ClickHouse and Kubernetes can perform better together.
At ChistaData, we are interested to write the following series of blogs to explain the ClickHouse on Kubernetes topic.
- ClickHouse on Minikube
- ClickHouse on Amazon Elastic Kubernetes Service ( Amazon EKS )
- ClickHouse on Google Kubernetes Engine ( GKE )
This is the first part. In this blog, I will explain the complete details of the Installation and configurations of the ClickHouse cluster on Minikube. I also tested the Cluster functionality after the configuration.
The blog will be a little big. I am sure you might be able to configure the ClickHouse cluster on Minikube after reading this completely.
What is Minikube?
- Minikube is a tool that lets you run Kubernetes cluster locally.
- Minikube can creates a VM on local machine and deploys a simple Kubernetes cluster containing only one node.
- Minikube is available for Linux, macOS, and Windows systems.
Overview of the ClickHouse Minikube Setup
My Environment
I am using Ubuntu 22.04 LTS (Jammy Jellyfish) to run this setup. CPU architecture is x86_64. It is 2 core CPU with 4GB of RAM and 25G SSD disk.
ubuntu@ip-172-31-2-151:~$ uname -m
x86_64
ubuntu@ip-172-31-2-151:~$ nproc
2
ubuntu@ip-172-31-2-151:~$ free -h
               total        used        free      shared  buff/cache   available
Mem:           3.8Gi       1.7Gi       428Mi        36Mi       1.8Gi       1.9Gi
Swap:             0B          0B          0B
ubuntu@ip-172-31-2-151:~$ df -Th /
Filesystem     Type  Size  Used Avail Use% Mounted on
/dev/root      ext4   25G  7.3G   17G  31% /
My Goal
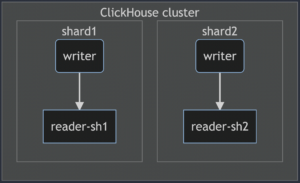
My goal is, I need to configure the ClickHouse cluster with 2 shards and each shard will have their own replica. The cluster needs to be created on Kubernetes using Minikube and Docker driver.
Expected ClickHouse Cluster Architecture
Requirement
We need the following tools to be installed to run this setup.
- Minikube
- Kubectl
- Docker
We need the following 3 components to be installed and configured through the Kubctl and YAML file.
- Clickhouse Operator (from Altinity)
- Zookeeper
- ClickHouse Cluster
Let’s go one by one.
Installing the tools
Docker installation
Docker is one of the drivers supported for Minikube. There are other drivers as well. You can refer to the link to learn about all the available drivers. I am going to use the “docker” as a driver. So, it is necessary to install Docker. The following steps can be used to install the docker.
sudo apt update
sudo apt install -y ca-certificates curl gnupg lsb-release
curl -fsSL https://download.docker.com/linux/ubuntu/gpg | sudo gpg --dearmor -o /usr/share/keyrings/docker-archive-keyring.gpg
echo "deb [arch=$(dpkg --print-architecture) signed-by=/usr/share/keyrings/docker-archive-keyring.gpg] https://download.docker.com/linux/ubuntu $(lsb_release -cs) stable" | sudo tee /etc/apt/sources.list.d/docker.list > /dev/null
sudo apt-get update
sudo apt install docker-ce docker-ce-cli containerd.io -y
Kubectl installation
Kubectl is used to perform the components installation through the YAML file and manage the cluster. So, it is necessary to install “kubectl.” The following steps can be used to install the “kubectl”.
sudo apt-get update
sudo apt-get install -y ca-certificates curl
sudo apt-get install -y apt-transport-https
sudo curl -fsSLo /usr/share/keyrings/kubernetes-archive-keyring.gpg https://packages.cloud.google.com/apt/doc/apt-key.gpg
echo "deb [signed-by=/usr/share/keyrings/kubernetes-archive-keyring.gpg] https://apt.kubernetes.io/ kubernetes-xenial main" | sudo tee /etc/apt/sources.list.d/kubernetes.list
sudo apt-get update
sudo apt-get install -y kubectl && echo done
Minikube Installation
Minikube is used to create the Kubernetes cluster locally. The following steps can be used to install the Minikube.
curl -LO https://storage.googleapis.com/minikube/releases/latest/minikube_latest_amd64.deb
sudo dpkg -i minikube_latest_amd64.deb
Verify the installations
root@ip-172-31-0-50:~# dpkg -l | grep -i 'minikube\|docker-ce\|kubectl'
ii  docker-ce                       5:20.10.17~3-0~ubuntu-jammy             amd64        Docker: the open-source application container engine
ii  kubectl                         1.25.0-00                               amd64        Kubernetes Command Line Tool
ii  minikube                        1.26.1-0                                amd64        Minikube
OK, it indicates the tools are installed properly.
Start local Kubernetes cluster using Minikube
So, after installing the needed tools, the next step is, We need to start the local Kubernetes cluster using Minikube. You can simply do this using the command “minikube start“. “docker” is the default driver, so you don’t need to mention it in the command. If you are planning to use different driver, then you need modify the command like “minikube start –driver=<driver_name>”.
Before running the command, we need to take care of two things.
- Don’t run the command as “root” user. It is not allowed.
- Make sure the user which whom you are running the command has the privileges to run the docker.
If you are running with the root, you will get the following error.
❌ Exiting due to DRV_AS_ROOT: The "docker" driver should not be used with root privileges.
If your user doesn’t have the privileges to run the docker, you will get the following error.
👎  Unable to pick a default driver. Here is what was considered, in preference order:
    ▪ docker: Not healthy: "docker version --format {{.Server.Os}}-{{.Server.Version}}" exit status 1: Got permission denied while trying to connect to the Docker daemon socket at unix:///var/run/docker.sock: Get "http://%2Fvar%2Frun%2Fdocker.sock/v1.24/version": dial unix /var/run/docker.sock: connect: permission denied
    ▪ docker: Suggestion: Add your user to the 'docker' group: 'sudo usermod -aG docker $USER && newgrp docker' <https://docs.docker.com/engine/install/linux-postinstall/>
The exception itself has the solution. Run the following command to fix the issue.
sudo usermod -aG docker $USER && newgrp docker
After fixing all this, I am running the command “minikube start”.
ubuntu@ip-172-31-0-50:~/clickhouse_operator_configs$ minikube start
😄  minikube v1.26.1 on Ubuntu 22.04 (xen/amd64)
✨  Automatically selected the docker driver. Other choices: ssh, none
📌  Using Docker driver with root privileges
👍  Starting control plane node minikube in cluster minikube
🚜  Pulling base image ...
💾  Downloading Kubernetes v1.24.3 preload ...
    > preloaded-images-k8s-v18-v1...:  405.75 MiB / 405.75 MiB  100.00% 215.87
    > gcr.io/k8s-minikube/kicbase:  386.60 MiB / 386.61 MiB  100.00% 25.71 MiB
    > gcr.io/k8s-minikube/kicbase:  0 B [________________________] ?% ? p/s 15s
🔥  Creating docker container (CPUs=2, Memory=2200MB) ...
🐳  Preparing Kubernetes v1.24.3 on Docker 20.10.17 ...
    ▪ Generating certificates and keys ...
    ▪ Booting up control plane ...
    ▪ Configuring RBAC rules ...
🔎  Verifying Kubernetes components...
    ▪ Using image gcr.io/k8s-minikube/storage-provisioner:v5
🌟  Enabled addons: default-storageclass, storage-provisioner
🏄  Done! kubectl is now configured to use "minikube" cluster and "default" namespace by default
Minikube is started now. We can verify the status as follows.
ubuntu@ip-172-31-0-50:~/clickhouse_operator_configs$ minikube status
minikube
type: Control Plane
host: Running
kubelet: Running
apiserver: Running
kubeconfig: Configured
Installing & configuring components
Now, I have started the local Kubernetes cluster. The next step is, I need to install/configure the following components through the YAML file.
- Clickhouse Operator (from Altinity)
- Zookeeper
- ClickHouse Cluster
For each of these components, an installation/configuration, we will have 2 files separately.
- One is the YAML file, which has all the configurations.
- Another one is the bash file, which has the commands to create the namespace and execute the YAML file.
Let’s do it one by one,
Note: The files I shared below are forked from Altinity. I just made few changes like “cluster name, operator name, Disk memory configurations”.
Install & Configure the ClickHouse Operator
As a first step, we need to install/configure the ClickHouse operator, which was created by Altinity. To configure the ClickHouse operator, we need to create the following files first.
- operator.yaml
- create-operator
The YAML file for the ClickHouse operator configuration is quite big. So, I have provided the git link for “operator.yaml” file. Using that, you can directly download from the git repository.
Once downloaded it, you will have the file named “operator.yaml”. You can also copy the entire content from the git link and store in the file “operator.yaml”.
So, we have the YAML file now for ClickHouse operator. The next step is need to create a bash script to create the namespace and execute the YAML file. Below I am sharing the commands for the bash file.
#!/bin/bash

CH_NAMESPACE="${CH_NAMESPACE:-chista-operator}"
CUR_DIR="$(cd "$(dirname "${BASH_SOURCE[0]}")" >/dev/null 2>&1 && pwd)"
kubectl create namespace "${CH_NAMESPACE}"
kubectl apply -n "${CH_NAMESPACE}" -f "${CUR_DIR}/operator.yaml"
Copy them and save in a file named “create-operator”. Then provide the execute permission and execute it.
chmod +x create-operator
./create-operator
At the end of the execution, it will create the namespace “chista-operator” and create the necessary services for ClickHouse operator. The output of the command will be like as following.
ubuntu@ip-172-31-0-50:~/clickhouse_operator_configs$ ./create-operator
namespace/chista-operator created
customresourcedefinition.apiextensions.k8s.io/clickhouseinstallations.clickhouse.altinity.com created
customresourcedefinition.apiextensions.k8s.io/clickhouseinstallationtemplates.clickhouse.altinity.com created
customresourcedefinition.apiextensions.k8s.io/clickhouseoperatorconfigurations.clickhouse.altinity.com created
serviceaccount/clickhouse-operator created
clusterrole.rbac.authorization.k8s.io/clickhouse-operator-chista-operator created
clusterrolebinding.rbac.authorization.k8s.io/clickhouse-operator-chista-operator created
configmap/etc-clickhouse-operator-files created
configmap/etc-clickhouse-operator-confd-files created
configmap/etc-clickhouse-operator-configd-files created
configmap/etc-clickhouse-operator-templatesd-files created
configmap/etc-clickhouse-operator-usersd-files created
deployment.apps/clickhouse-operator created
service/clickhouse-operator-metrics created
We can verify the current status using the following command.
ubuntu@ip-172-31-0-50:~/clickhouse_operator_configs$ kubectl get all -n chista-operator
NAME                                       READY   STATUS    RESTARTS   AGE
pod/clickhouse-operator-7df5898ffb-nqmr8   2/2     Running   0          2m24s

NAME                                  TYPE        CLUSTER-IP       EXTERNAL-IP   PORT(S)    AGE
service/clickhouse-operator-metrics   ClusterIP   10.108.168.236   <none>        8888/TCP   2m24s

NAME                                  READY   UP-TO-DATE   AVAILABLE   AGE
deployment.apps/clickhouse-operator   1/1     1            1           2m24s

NAME                                             DESIRED   CURRENT   READY   AGE
replicaset.apps/clickhouse-operator-7df5898ffb   1         1         1       2m24s
So the first component, ClickHouse operator is installed/configued.
Install & Configure Zookeeper
Next step, we need to install/configure the Zookeeper. Zookeeper is used to store the replicas meta information. To configure the zookeeper, We need the following files to be created.
- zookeeper.yaml
- create-zookeeper
To create YAML file, copy the following content and save in the file “zookeeper.yaml”
apiVersion: v1
kind: Service
metadata:
  # DNS would be like zookeeper.zoons
  name: zookeeper
  labels:
    app: zookeeper
spec:
  ports:
    - port: 2181
      name: client
    - port: 7000
      name: prometheus
  selector:
    app: zookeeper
    what: node
---
# Setup Headless Service for StatefulSet
apiVersion: v1
kind: Service
metadata:
  # DNS would be like zookeeper-0.zookeepers.etc
  name: zookeepers
  labels:
    app: zookeeper
spec:
  ports:
    - port: 2888
      name: server
    - port: 3888
      name: leader-election
  clusterIP: None
  selector:
    app: zookeeper
    what: node
---
# Setup max number of unavailable pods in StatefulSet
apiVersion: policy/v1beta1
kind: PodDisruptionBudget
metadata:
  name: zookeeper-pod-disruption-budget
spec:
  selector:
    matchLabels:
      app: zookeeper
  maxUnavailable: 1
---
# Setup Zookeeper StatefulSet
# Possible params:
# 1. replicas
# 2. memory
# 3. cpu
# 4. storage
# 5. storageClassName
# 6. user to run app
apiVersion: apps/v1
kind: StatefulSet
metadata:
  # nodes would be named as zookeeper-0, zookeeper-1, zookeeper-2
  name: zookeeper
spec:
  selector:
    matchLabels:
      app: zookeeper
  serviceName: zookeepers
  replicas: 1
  updateStrategy:
    type: RollingUpdate
  podManagementPolicy: Parallel
  template:
    metadata:
      labels:
        app: zookeeper
        what: node
      annotations:
        prometheus.io/port: '7000'
        prometheus.io/scrape: 'true'
    spec:
      containers:
        - name: kubernetes-zookeeper
          imagePullPolicy: IfNotPresent
          image: "docker.io/zookeeper:3.6.3"
#          resources:
#            requests:
#              memory: "128M"
#              cpu: "1"
#            limits:
#              memory: "1Gi"
#              cpu: "2"
          ports:
            - containerPort: 2181
              name: client
            - containerPort: 2888
              name: server
            - containerPort: 3888
              name: leader-election
            - containerPort: 7000
              name: prometheus
          # See those links for proper startup settings:
          # https://github.com/kow3ns/kubernetes-zookeeper/blob/master/docker/scripts/start-zookeeper
          # https://clickhouse.yandex/docs/en/operations/tips/#zookeeper
          # https://github.com/ClickHouse/ClickHouse/issues/11781
          command:
            - bash
            - -x
            - -c
            - |
              SERVERS=1 &&
              HOST=`hostname -s` &&
              DOMAIN=`hostname -d` &&
              CLIENT_PORT=2181 &&
              SERVER_PORT=2888 &&
              ELECTION_PORT=3888 &&
              PROMETHEUS_PORT=7000 &&
              ZOO_DATA_DIR=/var/lib/zookeeper/data &&
              ZOO_DATA_LOG_DIR=/var/lib/zookeeper/datalog &&
              {
                echo "clientPort=${CLIENT_PORT}"
                echo 'tickTime=2000'
                echo 'initLimit=300'
                echo 'syncLimit=10'
                echo 'maxClientCnxns=2000'
                echo 'maxSessionTimeout=60000000'
                echo "dataDir=${ZOO_DATA_DIR}"
                echo "dataLogDir=${ZOO_DATA_LOG_DIR}"
                echo 'autopurge.snapRetainCount=10'
                echo 'autopurge.purgeInterval=1'
                echo 'preAllocSize=131072'
                echo 'snapCount=3000000'
                echo 'leaderServes=yes'
                echo 'standaloneEnabled=false'
                echo '4lw.commands.whitelist=*'
                echo 'metricsProvider.className=org.apache.zookeeper.metrics.prometheus.PrometheusMetricsProvider'
                echo "metricsProvider.httpPort=${PROMETHEUS_PORT}"
              } > /conf/zoo.cfg &&
              {
                echo "zookeeper.root.logger=CONSOLE"
                echo "zookeeper.console.threshold=WARN"
                echo "log4j.rootLogger=\${zookeeper.root.logger}"
                echo "log4j.appender.CONSOLE=org.apache.log4j.ConsoleAppender"
                echo "log4j.appender.CONSOLE.Threshold=\${zookeeper.console.threshold}"
                echo "log4j.appender.CONSOLE.layout=org.apache.log4j.PatternLayout"
                echo "log4j.appender.CONSOLE.layout.ConversionPattern=%d{ISO8601} [myid:%X{myid}] - %-5p [%t:%C{1}@%L] - %m%n"
              } > /conf/log4j.properties &&
              echo 'JVMFLAGS="-Xms128M -Xmx1G -XX:+UseG1GC -XX:+CMSParallelRemarkEnabled"' > /conf/java.env &&
              if [[ $HOST =~ (.*)-([0-9]+)$ ]]; then
                  NAME=${BASH_REMATCH[1]}
                  ORD=${BASH_REMATCH[2]}
              else
                  echo "Failed to parse name and ordinal of Pod"
                  exit 1
              fi &&
              mkdir -p ${ZOO_DATA_DIR} &&
              mkdir -p ${ZOO_DATA_LOG_DIR} &&
              export MY_ID=$((ORD+1)) &&
              echo $MY_ID > $ZOO_DATA_DIR/myid &&
              for (( i=1; i<=$SERVERS; i++ )); do
                  echo "server.$i=$NAME-$((i-1)).$DOMAIN:$SERVER_PORT:$ELECTION_PORT" >> /conf/zoo.cfg;
              done &&
              chown -Rv zookeeper "$ZOO_DATA_DIR" "$ZOO_DATA_LOG_DIR" "$ZOO_LOG_DIR" "$ZOO_CONF_DIR" &&
              zkServer.sh start-foreground
          readinessProbe:
            exec:
              command:
                - bash
                - -c
                - "OK=$(echo ruok | nc 127.0.0.1 2181); if [[ \"$OK\" == \"imok\" ]]; then exit 0; else exit 1; fi"
            initialDelaySeconds: 10
            timeoutSeconds: 5
          livenessProbe:
            exec:
              command:
                - bash
                - -c
                - "OK=$(echo ruok | nc 127.0.0.1 2181); if [[ \"$OK\" == \"imok\" ]]; then exit 0; else exit 1; fi"
            initialDelaySeconds: 10
            timeoutSeconds: 5
          volumeMounts:
            - name: data-volume-ch
              mountPath: /var/lib/zookeeper
      # Run as a non-privileged user
      securityContext:
        runAsUser: 1000
        fsGroup: 1000
  volumeClaimTemplates:
    - metadata:
        name: data-volume-ch
      spec:
        accessModes:
          - ReadWriteOnce
        resources:
          requests:
            storage: 20Gi
To create the bash execution file. Copy the following content and save in file “create-zookeeper”
#!/bin/bash

ZK_NAMESPACE="${ZK_NAMESPACE:-chista-zookeeper}"

CUR_DIR="$(cd "$(dirname "${BASH_SOURCE[0]}")" >/dev/null 2>&1 && pwd)"

kubectl create namespace "${ZK_NAMESPACE}"
kubectl --namespace="${ZK_NAMESPACE}" apply -f "${CUR_DIR}/zookeeper.yaml"
Once both the files are created, we can provide the execute privilege to file “create-zookeeper” and execute it.
chmod +x create-zookeeper
./create-zookeeper
The output will be like as following
ubuntu@ip-172-31-0-50:~/clickhouse_operator_configs$ ./create-zookeeper
namespace/chista-zookeeper created
service/zookeeper created
service/zookeepers created
Warning: policy/v1beta1 PodDisruptionBudget is deprecated in v1.21+, unavailable in v1.25+; use policy/v1 PodDisruptionBudget
poddisruptionbudget.policy/zookeeper-pod-disruption-budget created
statefulset.apps/zookeeper created
It tells the Zookeeper namespace and services are created. We can verify the zookeeper service status using the following command.
ubuntu@ip-172-31-0-50:~/clickhouse_operator_configs$ kubectl get all -n chista-zookeeper
NAME              READY   STATUS    RESTARTS   AGE
pod/zookeeper-0   0/1     Running   0          30s

NAME                 TYPE        CLUSTER-IP      EXTERNAL-IP   PORT(S)             AGE
service/zookeeper    ClusterIP   10.104.24.101   <none>        2181/TCP,7000/TCP   30s
service/zookeepers   ClusterIP   None            <none>        2888/TCP,3888/TCP   30s

NAME                         READY   AGE
statefulset.apps/zookeeper   0/1     30s
Installing & Configuring ClickHouse Cluster
The next step is, We need to install and configure the ClickHouse cluster. To do this, we need the following files to be created.
- cluster.yaml
- create-cluster
To create the YAML file, use the following content and save the file named “cluster.yaml”
apiVersion: "clickhouse.altinity.com/v1"
kind: "ClickHouseInstallation"
metadata:
  name: "herc"
spec:
  # Templates are specified for all clusters ... if you want explicitly for each cluster then apply below
  defaults:
    templates:
      podTemplate: clickhouse
      dataVolumeClaimTemplate: data-volume-clickhouse
      logVolumeClaimTemplate: data-volume-clickhouse
  configuration:
    clusters:
      - name: "herc-cluster"
        layout:
          shardsCount: 2
          replicasCount: 2
    zookeeper:
      nodes:
        - host: zookeeper.chista-zookeeper
          port: 2181
  templates:
    podTemplates:
      - name: clickhouse
        spec:
          securityContext:
            runAsUser: 101
            runAsGroup: 101
            fsGroup: 101
          containers:
            - name: clickhouse
              image: yandex/clickhouse-server:21.10
              ports:
                - name: http
                  containerPort: 8123
                - name: client
                  containerPort: 9000
                - name: interserver
                  containerPort: 9009
              volumeMounts:
                - name: data-volume-clickhouse
                  mountPath: /var/lib/clickhouse
                - name: data-volume-clickhouse
                  mountPath: /var/log/clickhouse-server
    volumeClaimTemplates:
      - name: data-volume-clickhouse
        reclaimPolicy: Retain
        spec:
          accessModes:
            - ReadWriteOnce
          resources:
            requests:
              storage: 15Gi
To create the bash file copy the following content and save into file named “create-cluster”
#!/bin/bash

CH_NAMESPACE="${CH_NAMESPACE:-chista-operator}"

CUR_DIR="$(cd "$(dirname "${BASH_SOURCE[0]}")" >/dev/null 2>&1 && pwd)"

kubectl apply -n "${CH_NAMESPACE}" -f "${CUR_DIR}/cluster.yaml"
Let’s provide the execute permission to file “create-cluster” and execute it.
chmod +x create-cluster
./create-cluster
The output will be like as following,
ubuntu@ip-172-31-0-50:~/clickhouse_operator_configs$ ./create-cluster
clickhouseinstallation.clickhouse.altinity.com/herc created
Note: It will take sometime to create all the pods ( 2 shards and 2 replicas ).
The final output should be like as follow as.
ubuntu@ip-172-31-0-50:~/clickhouse_operator_configs$ kubectl get all -n chista-operator
NAME                                       READY   STATUS    RESTARTS   AGE
pod/chi-herc-herc-cluster-0-0-0            2/2     Running   0          3m10s
pod/chi-herc-herc-cluster-0-1-0            2/2     Running   0          2m8s
pod/chi-herc-herc-cluster-1-0-0            2/2     Running   0          87s
pod/chi-herc-herc-cluster-1-1-0            2/2     Running   0          55s
pod/clickhouse-operator-7df5898ffb-nqmr8   2/2     Running   0          8m31s

NAME                                  TYPE           CLUSTER-IP       EXTERNAL-IP   PORT(S)                         AGE
service/chi-herc-herc-cluster-0-0     ClusterIP      None             <none>        8123/TCP,9000/TCP,9009/TCP      2m22s
service/chi-herc-herc-cluster-0-1     ClusterIP      None             <none>        8123/TCP,9000/TCP,9009/TCP      110s
service/chi-herc-herc-cluster-1-0     ClusterIP      None             <none>        8123/TCP,9000/TCP,9009/TCP      69s
service/chi-herc-herc-cluster-1-1     ClusterIP      None             <none>        8123/TCP,9000/TCP,9009/TCP      37s
service/clickhouse-herc               LoadBalancer   10.103.101.11    <pending>     8123:31925/TCP,9000:30417/TCP   3m17s
service/clickhouse-operator-metrics   ClusterIP      10.108.168.236   <none>        8888/TCP                        8m31s

NAME                                  READY   UP-TO-DATE   AVAILABLE   AGE
deployment.apps/clickhouse-operator   1/1     1            1           8m31s

NAME                                             DESIRED   CURRENT   READY   AGE
replicaset.apps/clickhouse-operator-7df5898ffb   1         1         1       8m31s

NAME                                         READY   AGE
statefulset.apps/chi-herc-herc-cluster-0-0   1/1     3m10s
statefulset.apps/chi-herc-herc-cluster-0-1   1/1     2m8s
statefulset.apps/chi-herc-herc-cluster-1-0   1/1     87s
statefulset.apps/chi-herc-herc-cluster-1-1   1/1     55s
From the output, we can see that we have 4 pods ( chi-herc-herc-cluster-0-0-0/0-1-1/1-0-0/1-1-0 ).
Here,
- “chi-herc-herc-cluster-0-0-0” and “chi-herc-herc-cluster-1-0-0” are the shards.
- “chi-herc-herc-cluster-0-1-0” and “chi-herc-herc-cluster-1-1-0” are the respective replicas.
Shard 1
chi-herc-herc-cluster-0-0-0
  \_chi-herc-herc-cluster-0-1-0
Shard 2
chi-herc-herc-cluster-1-0-0
  \_chi-herc-herc-cluster-1-1-0
Each pods has their own services (service/chi-herc-herc-cluster-0-0/0-1/1-0/1-1). “service/clickhouse-herc” is the load balancer service, it can be used to split the load among the pods.
Connect ClickHouse pods and examine cluster information
Now, we have done with the installation and configuration. Next step is, we need to aware of how to connect the pods.
— You can directly login the pod shell and connect the clickhouse-client. For example,
ubuntu@ip-172-31-2-151:~$ kubectl exec -it chi-herc-herc-cluster-0-0-0 /bin/bash -n chista-operator
kubectl exec [POD] [COMMAND] is DEPRECATED and will be removed in a future version. Use kubectl exec [POD] -- [COMMAND] instead.
Defaulted container "clickhouse" out of: clickhouse, clickhouse-log
clickhouse@chi-herc-herc-cluster-0-0-0:/$ clickhouse-client
ClickHouse client version 21.10.5.3 (official build).
Connecting to localhost:9000 as user default.
Connected to ClickHouse server version 21.10.5 revision 54449.

Warnings:
* Effective user of the process (clickhouse) does not match the owner of the data (root).

chi-herc-herc-cluster-0-0-0.chi-herc-herc-cluster-0-0.chista-operator.svc.cluster.local :) show databases;

SHOW DATABASES

Query id: 569eb7bf-7972-4a06-a842-713927c3caf4

┌─name────┐
│ default │
│ system  │
└─────────┘

2 rows in set. Elapsed: 0.003 sec.
— You can also directly connect without login the pod shell using the following command.
ubuntu@ip-172-31-2-151:~$ kubectl exec -it chi-herc-herc-cluster-0-0-0 -n chista-operator -- clickhouse-client
Defaulted container "clickhouse" out of: clickhouse, clickhouse-log
ClickHouse client version 21.10.5.3 (official build).
Connecting to localhost:9000 as user default.
Connected to ClickHouse server version 21.10.5 revision 54449.

chi-herc-herc-cluster-0-0-0.chi-herc-herc-cluster-0-0.chista-operator.svc.cluster.local :) show databases;

SHOW DATABASES

Query id: 7ca11f84-0476-4a74-9756-e893ec895be8

┌─name────┐
│ default │
│ system  │
└─────────┘

2 rows in set. Elapsed: 0.004 sec.
Let’s Check the cluster and replication metadata,
From the YAML file ( cluster.yaml ), we provided the following configuration.
configuration:
   clusters:
     - name: "herc-cluster"
       layout:
         shardsCount: 2
         replicasCount: 2
- cluster name: “herc-cluster”
- shardCount: “2”
- replicaCount: “2”
From system.clusters table, We can see the same informations.
hi-herc-herc-cluster-0-0-0.chi-herc-herc-cluster-0-0.chista-operator.svc.cluster.local :) select cluster,shard_num,replica_num,host_name from system.clusters where cluster = 'herc-cluster';

SELECT
    cluster,
    shard_num,
    replica_num,
    host_name
FROM system.clusters
WHERE cluster = 'herc-cluster'

Query id: 481cb137-5f42-452a-90c5-f9afa391e0b0

┌─cluster──────┬─shard_num─┬─replica_num─┬─host_name─────────────────┐
│ herc-cluster │         1 │           1 │ chi-herc-herc-cluster-0-0 │
│ herc-cluster │         1 │           2 │ chi-herc-herc-cluster-0-1 │
│ herc-cluster │         2 │           1 │ chi-herc-herc-cluster-1-0 │
│ herc-cluster │         2 │           2 │ chi-herc-herc-cluster-1-1 │
└──────────────┴───────────┴─────────────┴───────────────────────────┘

4 rows in set. Elapsed: 0.004 sec.
From the above output, We have over all 4 nodes. For shard_num “1”, we have two nodes and for shard_num “2” we have two nodes and we can see the respective replicas as well. So, the configuration is perfect!
Check Replication and Distribution functionality
ClickHouse operator provides macros for installation, cluster,shard,replica by default. You can check the macros file from the following location inside the pod. Using the macros, we don’t need to manually provide the cluster, replica, shard names.
ubuntu@ip-172-31-2-151:~$ kubectl exec -it chi-herc-herc-cluster-0-0-0 /bin/bash -n chista-operator
kubectl exec [POD] [COMMAND] is DEPRECATED and will be removed in a future version. Use kubectl exec [POD] -- [COMMAND] instead.
Defaulted container "clickhouse" out of: clickhouse, clickhouse-log
clickhouse@chi-herc-herc-cluster-0-0-0:/$
clickhouse@chi-herc-herc-cluster-0-0-0:/$ cat /etc/clickhouse-server/conf.d/..2022_09_07_13_20_52.4222876942/chop-generated-macros.xml
<yandex>
    <macros>
        <installation>herc</installation>
        <all-sharded-shard>0</all-sharded-shard>
        <cluster>herc-cluster</cluster>
        <shard>0</shard>
        <replica>chi-herc-herc-cluster-0-0</replica>
    </macros>
</yandex>
Replication test
“chi-herc-herc-cluster-0-0-0” and “chi-herc-herc-cluster-0-1-0” are from shard1 and in same replication chain. Lets create a ReplicatedMergeTree table on “chi-herc-herc-cluster-0-0-0” and see if that is replicating on “chi-herc-herc-cluster-0-1-0”.
chi-herc-herc-cluster-0-0-0.chi-herc-herc-cluster-0-0.chista-operator.svc.cluster.local :) create table test1 on cluster '{cluster}' ( id Int32, applied_date Date, msg String) engine=ReplicatedMergeTree('/clickhouse/{installation}/{cluster}/tables/{shard}/{database}/{table}', '{replica}', applied_date, (msg, id), 8192);

CREATE TABLE test1 ON CLUSTER `{cluster}`
(
    `id` Int32,
    `applied_date` Date,
    `msg` String
)
ENGINE = ReplicatedMergeTree('/clickhouse/{installation}/{cluster}/tables/{shard}/{database}/{table}', '{replica}', applied_date, (msg, id), 8192)

Query id: 2f5cc119-7af1-4d93-b409-e6c4e721a3f1


chi-herc-herc-cluster-0-0-0.chi-herc-herc-cluster-0-0.chista-operator.svc.cluster.local :) insert into test1 values (1,'2022-09-07','Willing to join');

INSERT INTO test1 VALUES

Query id: cbd8169e-a10b-424f-82fc-584a0d66fe40

Ok.

1 rows in set. Elapsed: 0.024 sec.

chi-herc-herc-cluster-0-0-0.chi-herc-herc-cluster-0-0.chista-operator.svc.cluster.local :) select * from test1;

SELECT *
FROM test1

Query id: 2476eb7d-e6a3-4851-9b0d-5f17ebb68122

┌─id─┬─applied_date─┬─msg─────────────┐
│  1 │   2022-09-07 │ Willing to join │
└────┴──────────────┴─────────────────┘

1 rows in set. Elapsed: 0.006 sec.
Table created. If I check the data on “chi-herc-herc-cluster-0-0-0” and “chi-herc-herc-cluster-0-1-0”, the data is replicated to 0-1-0 and available on both nodes.
ubuntu@ip-172-31-2-151:~$ kubectl exec -it chi-herc-herc-cluster-0-1-0 -n chista-operator -- clickhouse-client
Defaulted container "clickhouse" out of: clickhouse, clickhouse-log
ClickHouse client version 21.10.5.3 (official build).
Connecting to localhost:9000 as user default.
Connected to ClickHouse server version 21.10.5 revision 54449.

Warnings:
* Effective user of the process (clickhouse) does not match the owner of the data (root).

chi-herc-herc-cluster-0-1-0.chi-herc-herc-cluster-0-1.chista-operator.svc.cluster.local :)
chi-herc-herc-cluster-0-1-0.chi-herc-herc-cluster-0-1.chista-operator.svc.cluster.local :) select * from test1;

SELECT *
FROM test1

Query id: a8830d88-d8a1-4c46-a145-c30d1209b872

┌─id─┬─applied_date─┬─msg─────────────┐
│  1 │   2022-09-07 │ Willing to join │
└────┴──────────────┴─────────────────┘

1 rows in set. Elapsed: 0.006 sec.
But, the data is not available on the shard 2 nodes ( 1-0-0 and 1-1-0 ). Because, the replication will happens on same replication chain nodes. To replicate data among shards, we need to create the distributed table.
ubuntu@ip-172-31-2-151:~$ kubectl exec -it chi-herc-herc-cluster-1-0-0 -n chista-operator -- clickhouse-client
Defaulted container "clickhouse" out of: clickhouse, clickhouse-log
ClickHouse client version 21.10.5.3 (official build).
Connecting to localhost:9000 as user default.
Connected to ClickHouse server version 21.10.5 revision 54449.

Warnings:
* Effective user of the process (clickhouse) does not match the owner of the data (root).

chi-herc-herc-cluster-1-0-0.chi-herc-herc-cluster-1-0.chista-operator.svc.cluster.local :) select * from test1;

SELECT *
FROM test1

Query id: 8853f4a7-b38f-43d9-9d14-d0aefc8d20c0

Ok.

0 rows in set. Elapsed: 0.003 sec.

chi-herc-herc-cluster-1-0-0.chi-herc-herc-cluster-1-0.chista-operator.svc.cluster.local :) \q
Bye.
ubuntu@ip-172-31-2-151:~$ kubectl exec -it chi-herc-herc-cluster-1-1-0 -n chista-operator -- clickhouse-client
Defaulted container "clickhouse" out of: clickhouse, clickhouse-log
ClickHouse client version 21.10.5.3 (official build).
Connecting to localhost:9000 as user default.
Connected to ClickHouse server version 21.10.5 revision 54449.

Warnings:
* Effective user of the process (clickhouse) does not match the owner of the data (root).

chi-herc-herc-cluster-1-1-0.chi-herc-herc-cluster-1-1.chista-operator.svc.cluster.local :) select * from test1;

SELECT *
FROM test1

Query id: cf8cec76-8e43-4227-8c08-0f5a23a44e64

Ok.

0 rows in set. Elapsed: 0.005 sec.
Distribution test
Lets connect the pod “chi-herc-herc-cluster-0-0-0” from shard1 and create the distributed table “dist_te1” with the reference of table “test1”.
chi-herc-herc-cluster-0-0-0.chi-herc-herc-cluster-0-0.chista-operator.svc.cluster.local :) create table default.dist_te1 on cluster '{cluster}' as default.test1 engine = Distributed('{cluster}', default, test1, rand());

CREATE TABLE default.dist_te1 ON CLUSTER `{cluster}` AS default.test1
ENGINE = Distributed('{cluster}', default, test1, rand())

Query id: bed72db3-81b8-4149-9d5a-4c1d160f196f

┌─host──────────────────────┬─port─┬─status─┬─error─┬─num_hosts_remaining─┬─num_hosts_active─┐
│ chi-herc-herc-cluster-0-0 │ 9000 │      0 │       │                   3 │                0 │
│ chi-herc-herc-cluster-0-1 │ 9000 │      0 │       │                   2 │                0 │
│ chi-herc-herc-cluster-1-0 │ 9000 │      0 │       │                   1 │                0 │
│ chi-herc-herc-cluster-1-1 │ 9000 │      0 │       │                   0 │                0 │
└───────────────────────────┴──────┴────────┴───────┴─────────────────────┴──────────────────┘

4 rows in set. Elapsed: 0.153 sec.
Let’s verify the data on all pods from both shard1 and shard2.
shard1 (0-0-0):

chi-herc-herc-cluster-0-0-0.chi-herc-herc-cluster-0-0.chista-operator.svc.cluster.local :) select * from default.dist_te1;

SELECT *
FROM default.dist_te1

Query id: d5022f8a-0adb-49a8-947a-61bb4cfb9735

┌─id─┬─applied_date─┬─msg─────────────┐
│  1 │   2022-09-07 │ Willing to join │
└────┴──────────────┴─────────────────┘

1 rows in set. Elapsed: 0.029 sec.

shard1 (0-1-0):

chi-herc-herc-cluster-0-1-0.chi-herc-herc-cluster-0-1.chista-operator.svc.cluster.local :) select * from default.dist_te1;

SELECT *
FROM default.dist_te1

Query id: 6a237eac-c050-4460-8ba7-f33eb551b22f

┌─id─┬─applied_date─┬─msg─────────────┐
│  1 │   2022-09-07 │ Willing to join │
└────┴──────────────┴─────────────────┘

1 rows in set. Elapsed: 0.219 sec.

shard2 (1-0-0):

chi-herc-herc-cluster-1-0-0.chi-herc-herc-cluster-1-0.chista-operator.svc.cluster.local :) select * from default.dist_te1;

SELECT *
FROM default.dist_te1

Query id: db72abc7-4ba5-46e1-9230-67d8dd584945

┌─id─┬─applied_date─┬─msg─────────────┐
│  1 │   2022-09-07 │ Willing to join │
└────┴──────────────┴─────────────────┘

1 rows in set. Elapsed: 0.041 sec.

shard2 (1-1-0):

chi-herc-herc-cluster-1-1-0.chi-herc-herc-cluster-1-1.chista-operator.svc.cluster.local :) select * from default.dist_te1;

SELECT *
FROM default.dist_te1

Query id: 24c2d530-f1be-44bd-84f0-be735d272540

┌─id─┬─applied_date─┬─msg─────────────┐
│  1 │   2022-09-07 │ Willing to join │
└────┴──────────────┴─────────────────┘

1 rows in set. Elapsed: 0.009 sec.
Data is distributed and available on all nodes. So, It works perfectly.
Conclusion
Hopefully, this blog will be helpful in understanding the configurations involved in the ClickHosue cluster on Minikube. I will continue with this series and will come up with other parts ( GKE & Amazon EKS ) soon. Thank you!
To learn more about Kubernetes and ClickHouse, read the following articles:
- ClickHouse on Kubernetes: Running ClickHouse Cluster on Amazon EKS
- ClickHouse on Kubernetes: Running ClickHouse Cluster on Google Kubernetes Engine
Reference:
- https://github.com/Altinity/clickhouse-operator
- https://kubernetes.io/docs/tasks/tools/install-kubectl-linux/
- https://minikube.sigs.k8s.io/docs/start/
- https://medium.com/@tonycini93/data-warehouse-on-kubernetes-21339c86daf6
- https://docs.docker.com/engine/install/ubuntu/