Introduction
Kubernetes orchestration simplifies many common operational concerns like scheduling, auto-scaling, and failover. Usually, databases that support replication, sharding, and auto-scaling are well-suited for Kubernetes. ClickHouse and Kubernetes can perform better together.
At ChistaData, we are interested in writing the following series of blogs to explain the ClickHouse on Kubernetes topic.
- ClickHouse on Minikube
- ClickHouse on Google Kubernetes Engine (GKE )
- ClickHouse on Amazon Elastic Kubernetes Service (Amazon EKS)
This is the third part of the series.
In this blog post, we will explain the complete details of the Installation and configuration process of the ClickHouse cluster on Google Kubernetes Engine.
Overview of ClickHouse on GKE
To complete the setup, we need to work on the following steps.
- Enable the Kubernetes Engine API
- Gcloud cli Installation
- Kubectl Installation
- Install Auth plugin
- Create the GKE Cluster
- Gcloud Configurations
- Cloning ClickHouse cluster configs and configurations
- Testing the connections and cluster status
Enable the Kubernetes Engine API
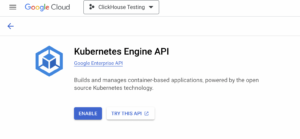
The first step we would say is to login your Google Cloud account and enable the Kubernetes Engine API as shown below.

Once the API enabled, we are able to create the GKE cluster.
Google Cloud CLI Installation
The Google Cloud CLI is a set of tools to create and manage Google Cloud resources. You can use these tools to perform many common platform tasks from the command line or through scripts and other automation. The following steps can be used to install the gcloud cli on Ubuntu servers.
sudo apt-get install apt-transport-https ca-certificates gnupg
echo "deb [signed-by=/usr/share/keyrings/cloud.google.gpg] https://packages.cloud.google.com/apt cloud-sdk main" | sudo tee -a /etc/apt/sources.list.d/google-cloud-sdk.list
curl https://packages.cloud.google.com/apt/doc/apt-key.gpg | sudo apt-key --keyring /usr/share/keyrings/cloud.google.gpg add -
sudo apt-get update
sudo apt-get install google-cloud-cli
Ref: https://cloud.google.com/sdk/docs/install#deb
Kubectl Installation
The Kubernetes command-line tool, kubectl, allows you to run commands against Kubernetes clusters. The following steps can be used to install the “kubectl” client tool.
sudo curl -fsSLo /usr/share/keyrings/kubernetes-archive-keyring.gpg https://packages.cloud.google.com/apt/doc/apt-key.gpg
echo "deb [signed-by=/usr/share/keyrings/kubernetes-archive-keyring.gpg] https://apt.kubernetes.io/ kubernetes-xenial main" | sudo tee /etc/apt/sources.list.d/kubernetes.list
sudo apt-get update
sudo apt-get install -y kubectl
Install Auth plugin
“google-cloud-sdk-gke-gcloud-auth-plugin” is the authentication plugin used to authenticate the GKE cluster and generate the GKE related tokens. It can be installed by using the following command.
apt-get install google-cloud-sdk-gke-gcloud-auth-plugin
Create the GKE Cluster
Now, we have installed the requirements. The next step is, need to create the GKE cluster on the console. Follow the below steps to create the GKE cluster.
Search “Kubernetes” on the search tab then choose the “Kubernetes Engine” topic.

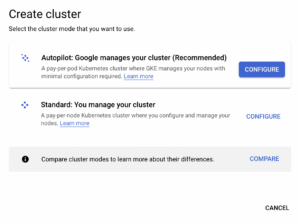
Then click on the “CREATE” option. it will displays to options ( Autopilot & Standard ). You can choose any of these. We used to choose the “Standard” option. Choosing the “, Autopilot” option will enable automatic management from GKE.

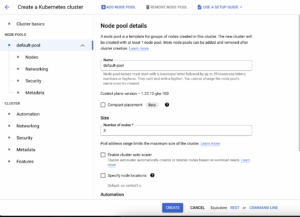
Once you select the mode, It will redirect to the configuration page. There you can choose the cluster name, node configurations, security, networking, etc. Once you have configured everything, click the “CREATE” button below.

Note: Make sure you have the enough Quotas to create the cluster. otherwise, you will get the errors.
Once you clicked on the “CREATE” button, you can see the progress of the cluster creation. It might take some 5 – 10 minutes for the entire configuration.

Once the configuration completed, you can see the GKE cluster is available with green tick mark.

Google Cloud Configurations
Now, we have created the GKE cluster. The next step is we need to configure the gcloud Clie with the cluster.
configure the project id ( project id can be get from console by clicking your project profile )
root@chista-gke:~# gcloud config set project orbital-heaven-298517
Updated property [core/project].
Update the cube config with the GKE cluster credentials so that we can access the GKE cluster using “kubectl” command.
root@chista-gke:~/ClickHouseCluster# gcloud container clusters get-credentials chista-gke-cluster --zone asia-east1-a
Fetching cluster endpoint and auth data.
kubeconfig entry generated for chista-gke-cluster.
This will automatically updates the cube config as shown below.
root@chista-gke:~# cat .kube/config | tail -n9
- name: gke_orbital-heaven-298517_us-east1_chista-gke-cluster
  user:
    auth-provider:
      config:
        cmd-args: config config-helper --format=json
        cmd-path: /usr/lib/google-cloud-sdk/bin/gcloud
        expiry-key: '{.credential.token_expiry}'
        token-key: '{.credential.access_token}'
      name: gcp
Now, we can access the GKE cluster by using the “kubectl” command.
root@chista-gke:~/ClickHouseCluster# kubectl get namespace
NAME              STATUS   AGE
default           Active   4m9s
kube-node-lease   Active   4m12s
kube-public       Active   4m12s
kube-system       Active   4m12s
Now we are good to configure the ClickHouse cluster.
Cloning cluster configurations
The next step is, we need to configure the ClickHouse cluster. The configs are publicly available in our repository. You can clone them directly as follows.
root@chista-gke:~# git clone https://github.com/ChistaDATA/clickhouse_lab.git
Cloning into 'clickhouse_lab'...
remote: Enumerating objects: 9, done.
remote: Counting objects: 100% (9/9), done.
remote: Compressing objects: 100% (8/8), done.
remote: Total 9 (delta 1), reused 0 (delta 0), pack-reused 0
Receiving objects: 100% (9/9), 29.61 KiB | 286.00 KiB/s, done.
Resolving deltas: 100% (1/1), done.
Once you have cloned the repository, you might see the following files under the folder “clickhouse_lab/ClickHouseCluster”.
root@chista-gke:~# cd ClickHouseCluster/
root@chista-gke:~/ClickHouseCluster# pwd
/root/ClickHouseCluster
root@chista-gke:~/ClickHouseCluster# ls -lrth
total 252K
-rwxr-xr-x 1 root root 241 Nov 29 07:33 create-operator
-rw-r--r-- 1 root root 6.1K Nov 29 07:33 zookeeper.yaml
-rwxr-xr-x 1 root root 199 Nov 29 07:33 create-cluster
-rw-r--r-- 1 root root 227K Nov 29 07:33 operator.yaml
-rwxr-xr-x 1 root root 254 Nov 29 07:33 create-zookeeper
-rw-r--r-- 1 root root 1.6K Nov 29 09:07 cluster.yaml
Here you can see three .yaml files and the respective bash files. We can execute the bash files one by one, it will call the respective config and build the cluster.
First we need to call the operator script as shown below,
root@chista-gke:~/ClickHouseCluster# ./create-operator
namespace/chista-operator created
customresourcedefinition.apiextensions.k8s.io/clickhouseinstallations.clickhouse.altinity.com created
customresourcedefinition.apiextensions.k8s.io/clickhouseinstallationtemplates.clickhouse.altinity.com created
customresourcedefinition.apiextensions.k8s.io/clickhouseoperatorconfigurations.clickhouse.altinity.com created
serviceaccount/clickhouse-operator created
clusterrole.rbac.authorization.k8s.io/clickhouse-operator-chista-operator created
clusterrolebinding.rbac.authorization.k8s.io/clickhouse-operator-chista-operator created
configmap/etc-clickhouse-operator-files created
configmap/etc-clickhouse-operator-confd-files created
configmap/etc-clickhouse-operator-configd-files created
configmap/etc-clickhouse-operator-templatesd-files created
configmap/etc-clickhouse-operator-usersd-files created
deployment.apps/clickhouse-operator created
service/clickhouse-operator-metrics created
Secondly, we need to call the zookeeper script,
root@chista-gke:~/ClickHouseCluster# ./create-zookeeper
namespace/chista-zookeeper created
service/zookeeper created
service/zookeepers created
poddisruptionbudget.policy/zookeeper-pod-disruption-budget created
statefulset.apps/zookeeper created
Finally, we need to call the cluster script as shown below,
root@chista-gke:~/ClickHouseCluster# ./create-cluster
clickhouseinstallation.clickhouse.altinity.com/herc created
ClickHouse Cluster is created. We can verify this using the following command.
root@chista-gke:~/ClickHouseCluster# kubectl get pods -n chista-operator
NAME READY STATUS RESTARTS AGE
chi-herc-herc-cluster-0-0-0 2/2 Running 0 77m
chi-herc-herc-cluster-0-1-0 2/2 Running 0 76m
chi-herc-herc-cluster-1-0-0 2/2 Running 0 76m
chi-herc-herc-cluster-1-1-0 2/2 Running 0 75m
clickhouse-operator-58768cf654-h7c8s 2/2 Running 0 79m
As per the config ( cluster.yaml ), We have mentioned 2 replicas and 2 shards.
root@chista-gke:~# less cluster.yaml| grep -i 'repl\|shard'
          shardsCount: 2
          replicasCount: 2
Here,
- “chi-herc-herc-cluster-0-0-0” and “chi-herc-herc-cluster-1-0-0” are the shards.
- “chi-herc-herc-cluster-0-1-0” and “chi-herc-herc-cluster-1-1-0” are the respective replicas.
Shard 1:
chi-herc-herc-cluster-0-0-0
  \_chi-herc-herc-cluster-0-1-0
Shard 2:
chi-herc-herc-cluster-1-0-0
  \_chi-herc-herc-cluster-1-1-0
The cluster setup is completed!
Testing the connections and cluster status
You can use the following command to go directly login the ClickHouse shell.
root@chista-gke:~# kubectl exec -it chi-herc-herc-cluster-0-0-0 -n chista-operator -- clickhouse-client
Defaulted container "clickhouse" out of: clickhouse, clickhouse-log
ClickHouse client version 21.10.5.3 (official build).
Connecting to localhost:9000 as user default.
Connected to ClickHouse server version 21.10.5 revision 54449.

chi-herc-herc-cluster-0-0-0.chi-herc-herc-cluster-0-0.chista-operator.svc.cluster.local :) show databases;

SHOW DATABASES

Query id: 62d8526c-9785-4f9c-99ce-81e1fb1a2ee5

┌─name────┐
│ default │
│ system  │
└─────────┘

2 rows in set. Elapsed: 0.004 sec.
You can also use the following method to login the OS shell then ClickHouse shell.
root@chista-gke:~# kubectl exec -it chi-herc-herc-cluster-0-0-0 /bin/bash -n chista-operator
clickhouse@chi-herc-herc-cluster-0-0-0:/$ clickhouse-client
ClickHouse client version 21.10.5.3 (official build).
Connecting to localhost:9000 as user default.
Connected to ClickHouse server version 21.10.5 revision 54449.

chi-herc-herc-cluster-0-0-0.chi-herc-herc-cluster-0-0.chista-operator.svc.cluster.local :) show databases;

SHOW DATABASES

Query id: da2bd4c4-e9fa-4c8c-8862-e5252fe6d476

┌─name────┐
│ default │
│ system  │
└─────────┘

2 rows in set. Elapsed: 0.003 sec.
ClickHouse cluster status:
chi-herc-herc-cluster-0-0-0.chi-herc-herc-cluster-0-0.chista-operator.svc.cluster.local :) SELECT cluster, shard_num, replica_num, host_name FROM system.clusters WHERE cluster = 'herc-cluster'

SELECT
    cluster,
    shard_num,
    replica_num,
    host_name
FROM system.clusters
WHERE cluster = 'herc-cluster'

Query id: 2c38e844-c2f3-46f5-b34f-7eca7f2754be

┌─cluster──────┬─shard_num─┬─replica_num─┬─host_name─────────────────┐
│ herc-cluster │         1 │           1 │ chi-herc-herc-cluster-0-0 │
│ herc-cluster │         1 │           2 │ chi-herc-herc-cluster-0-1 │
│ herc-cluster │         2 │           1 │ chi-herc-herc-cluster-1-0 │
│ herc-cluster │         2 │           2 │ chi-herc-herc-cluster-1-1 │
└──────────────┴───────────┴─────────────┴───────────────────────────┘

4 rows in set. Elapsed: 0.027 sec.
From the above output, We have overall 4 nodes. For shard_num “1”, we have two nodes, and for shard_num “2” we have two nodes, and we can see the respective replicas as well. So, the configuration is perfect!
Conclusion
Hopefully, this blog will help you understand the configurations involved in the ClickHouse cluster on Google Kubernetes Engine. Thank you!